Security Server is a dedicated virtual machine that de-duplicates and centralizes most of the antimalware functionality of antimalware clients, acting as a scan server.
You must install Security Server on one or more hosts so as to accommodate the number of virtual machines to be protected.
You must consider the number of protected virtual machines, resources available for Security Server on hosts, as well as network connectivity between Security Server and protected virtual machines.
The security agent installed on virtual machines connects to Security Server over TCP/IP, using details configured at installation or via a policy.
Download Security Server installation packages
To download Security Server installation packages:
Go to the Network > Packages page.
Select the Default Security Server Package.
Click the
 Download button at the upper side of the table and choose the package type from the menu.
Save the selected package to the desired location.
Deploy Security Server installation packages
Once you have the installation package, deploy it to the host using your preferred virtual machine deployment tool.
After deployment, set up the Security Server as follows:
Access the appliance console from your virtualization management tool (for example, vSphere Client). Alternatively, you can connect to the appliance via SSH.
Log in using the default credentials.
User name:
rootPassword:
sve
Run the
sva-setupcommand. You will access the appliance configuration interface.
To navigate through menus and options, use the
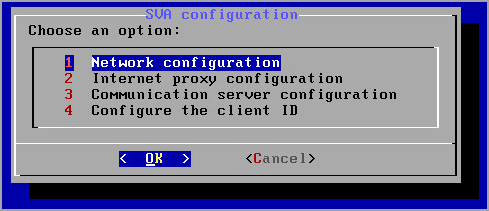
Taband arrow keys. To select a specific option, pressEnter.Configure the network settings.
The Security Server uses the TCP/IP protocol to communicate with the other GravityZone components. You can configure the appliance to automatically obtain network settings from the DHCP server or you can manually configure network settings, as described herein:
From the main menu, select Network configuration.
Select the network interface.
Select the IP configuration mode:
DHCP, if you want the Security Server to automatically obtain network settings from the DHCP server.
Static, if a DHCP server is absent or an IP reservation for the appliance has been made on the DHCP server. In this case, you must manually configure the network settings.
Enter the hostname, IP address, network mask, gateway and DNS servers in the corresponding fields.
Select OK to save the changes.
Note
If you are connected to the appliance via a SSH client, changing the network settings will immediately terminate your session.
Configure the proxy settings.
If a proxy server is used within the network, you must provide its details so that the Security Server can communicate with GravityZone Control Center.
Note
Only proxies with basic authentication are supported.
From the main menu, select Internet proxy configuration.
Enter the hostname, username, password and the domain in the corresponding fields.
Select OK to save the changes.
Configure the Communication Server address.
From the main menu, select Communication server configuration.
Enter one of the following addresses for the Communication Server:
https://cloud-ecs.gravityzone.bitdefender.com:443https://cloudgz-ecs.gravityzone.bitdefender.com:443
Important
This address must be the same as the one that appears in Control Center policy settings. To check the link, go to the Policies page, add or open a custom policy, navigate to the General > Communication > Endpoint Communication Assignment section and enter the Communication Server name in the column header field and select or write
ECS. The correct server will appear in search results.Select OK to save the changes.
Configure the client ID.
From the main menu, select Configure the client ID.
Enter the company ID.
The ID is a string of 32 characters, which you can find by accessing the company details page in Control Center.
Select OK to save the changes.