This section provides you with information regarding the Security Server manual installation on various platforms.
Install Security Server on an Ubuntu machine from XenServer, ESXi or AWS
Bitdefender provides the Security Server under several formats, such as OVA, VHD or XVA. When the virtual environment uses an unsupported format, such as Amazon AMI, manual installation is an option.
In this section , you will learn how to install Security Server through a script on an Ubuntu machine from your environment (Citrix XenServer, VMware ESXi, AWS).
Requirements
Hardware
Memory and CPU resource allocation for the Security Server depends on the number and type of VMs running on the host. The following table lists the recommended resources to be allocated:
Consolidation | Number of protected virtual machines | RAM | CPUs |
Low | 1-30 VMs | 2 GB | 2 CPUs |
31-50 VMs | 4 GB | 2 CPUs | |
Medium | 51-100 VMs | 4 GB | 4 CPUs |
High | 101-200 VMs | 4 GB | 6 CPUs |
HDD: 16 GB (SSD, if available)
Software
Prerequisites
On the physical server, install Ubuntu 16.04.3, with a working internet connection.
Use any authentication method to log in.
Installation steps
Deploy a new Ubuntu 20.04 instance in your environment.
Get root privileges:
sudo suor
sudo -iUpdate the OS to the latest version.
apt-get update;apt-get dist-upgradeDownload the script from here and unpack the archive.
Use the following command to assign execute permission:
chmod 500 install-scan-server.datNavigate to the downloaded script and run it to install and update the Security Server:
./install-scan-server.datYou can follow the output of this command to check when the installation task is completed.
Open the following log file after the installation is completed.
/opt/BitDefender/var/log/update.logCheck the output for a completed update process.
The end of the output returns the following:
dateStamp BDLIVED[4755] INFO: Done installing updates: 5 location(s) updated.Note
If the update process is not yet finished, please wait while the Security Server runs through all the updates.
Run the Security Server (SVA) setup.
/opt/BitDefender/bin/sva_setup.shSelect option 3 Communication Server configuration from the menu.
Choose whether the GravityZone solution you have is an on-premises or a cloud solution.
Enter the IP and the port number of the Communication Server to which the Security Server should connect, followed by port 8443. For example: 10.10.0.9:8443
Select Ok to confirm your action.
For any other question regarding the GravityZone product please contact: gzn-gs@bitdefender.com.
Install Bitdefender Security Server in Nutanix Prism
This section describes how to manually deploy Bitdefender Security Server in Nutanix Prism.
GravityZone allows you to integrate Control Center with Nutanix Prism Element for high-class protection of your virtualization platform. You are able to integrate one or more Nutanix Prism Element clusters, either they are registered or unregistered to Nutanix Prism Central.
Nutanix Prism Element integration overview
To protect a Nutanix Prism Element cluster, you have to deploy a Bitdefender Security Server on each host. You can do this by running a remote installation task in GravityZone Control Center. However, the installation task may fail when the Nutanix Prism Element cluster is registered to Prism Central or because of another reason.
When Nutanix Prism Element is registered to Prism Central, GravityZone is unable to automatically upload the Security Server in Nutanix because of certain user restrictions. Therefore, you need to:
Upload the Security Server image in Nutanix Prism Central.
Run again the installation task in GravityZone Control Center.
When Nutanix Prism Element is not registered to Prism Central, but the remote installation task still fails, you need to:
Run again the installation task in GravityZone Control Center.
If the case, upload and configure Security Server in Nutanix Prism Element.
Important
The Nutanix Prism Element integration with GravityZone requires a Nutanix user with Cluster Admin or User Admin privileges. Please review these privileges when performing tasks in Control Center.
How to upload the Security Server image in Nutanix Prism
Requirements
Before starting Security Server upload and configuration in Nutanix Prism, you must have at hand:
Nutanix Prism credentials.
Bitdefender Security Server image in VMDK format. You can download it from Network > Packages in GravityZone Control Center.
Uploading Security Server in Nutanix Prism Central
You need to manually upload the Security Server image in Nutanix Prism Central when the Nutanix Prism Element cluster is registered to Prism Central. Follow these steps:
Important
Wait for the image to be both uploaded and updated. After that, run again the installation task in GravityZone Control Center.
Log in to Nutanix Prism Central.
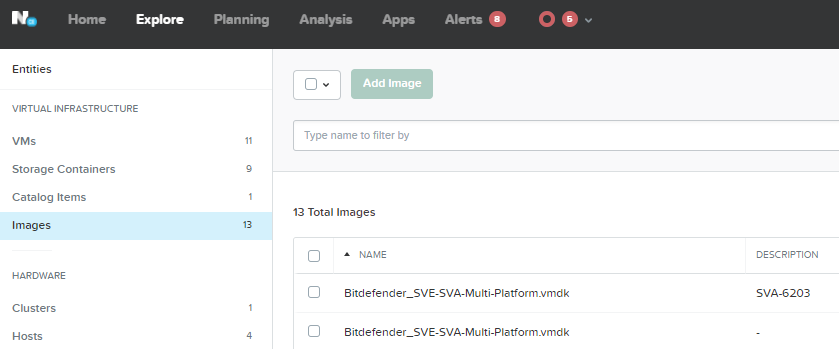
Go to Explore > Images.

Click Add Image.
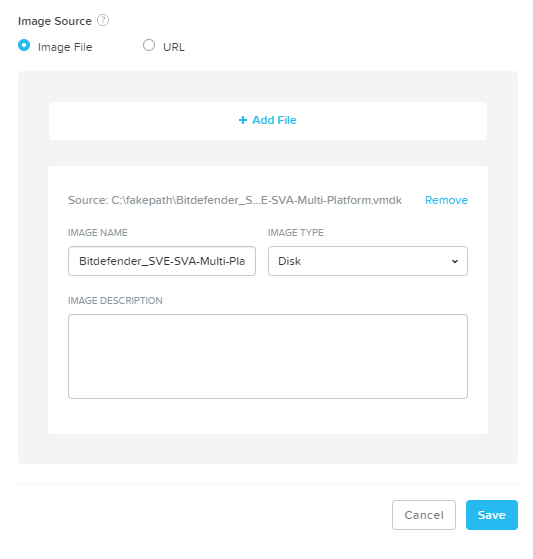
Make sure you have the Image File radio button selected and click Add File to select the Bitdefender image from where it is stored.
Check the image details:
Under Image Name, keep the file original name:
Bitdefender_SVE-SVA-Multi-Platform.vmdk. Otherwise, the Security Server installation will fail.Under Image Type, select Disk.
Optionally, add an image description.
Click Save. The Security Server image upload begins and it can take several minutes. You can view the progress in Tasks.
Uploading Security Server in Nutanix Prism Element
This is how you manually upload the Security Server when Nutanix Prism Element in not registered to Prism Central:
Log in to Nutanix Prism Element.
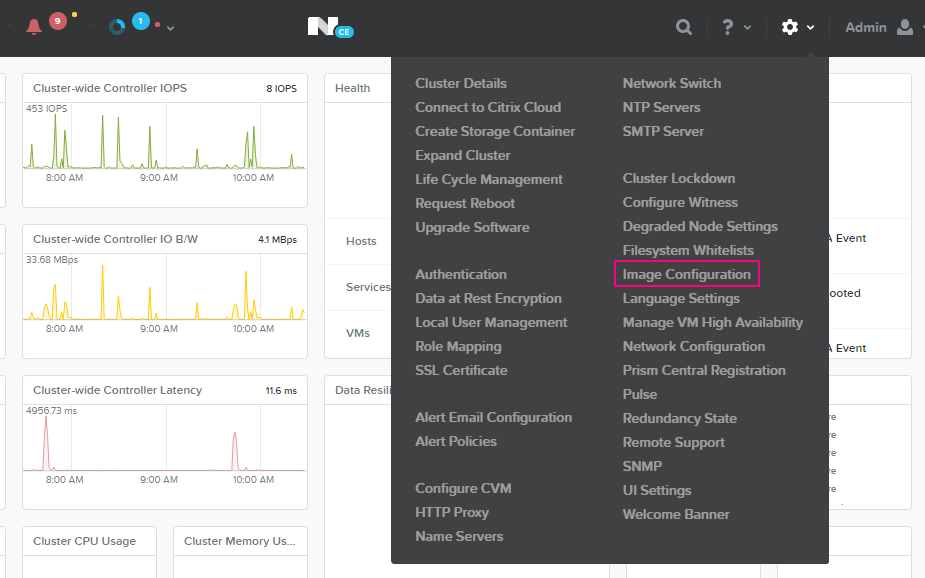
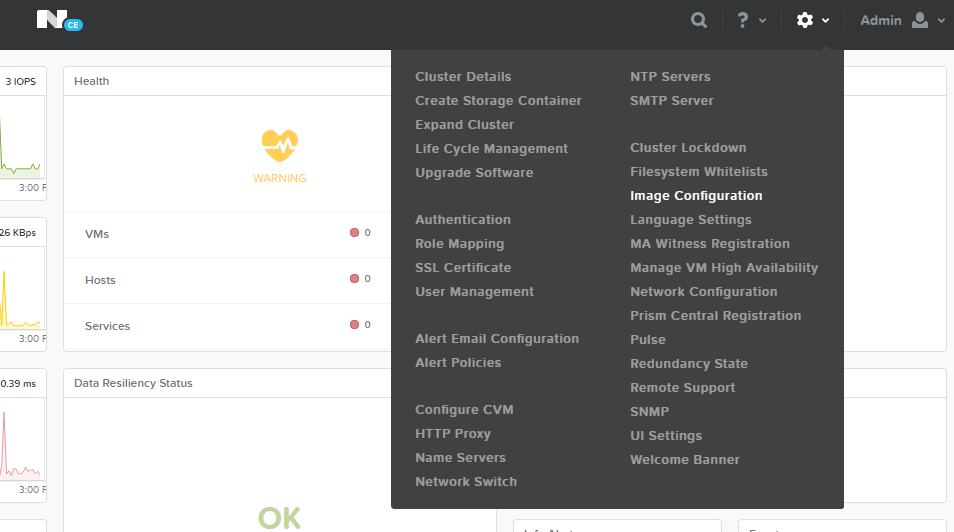
Go to Settings > Image Configuration.
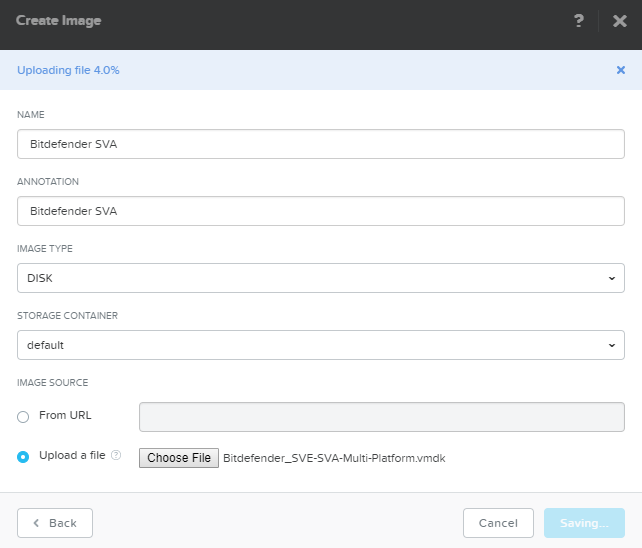
Click Upload Image. A new window appears.
Fill in the details:
Name.
Annotation.
Select the image type: DISK.
Select the preferred storage container.
Click Upload a file, then click Choose File to select the Security Server image from where it is stored.
Click Save.
The Security Server image upload begins and it can take several minutes. You can view the progress in Tasks.
Wait for the image to be both uploaded and updated.
How to configure Security Server in Nutanix Prism
Once you have the Security Server image uploaded in Nutanix Prism, you can either:
Run a remote installation task in GravityZone Control Center. Security Server will be automatically configured.
Manually configure Security Server in Nutanix Prism. That means you have to create a Security Server virtual machine, power it on and configure the Communication Server address in the Security Server console.
To configure a Security Server virtual machine you must follow these steps in Prism Element or in Prism Central:
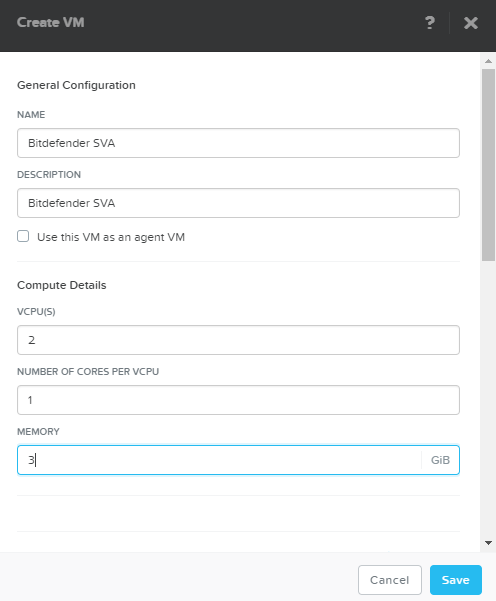
Go to the virtual machines list and click Create VM.
Fill in the required details:
Under General Configuration, enter a name and, optionally, a description.
Under Compute Details, choose 2 VCPUs, 1 core per VCPU and 3 GB of memory.
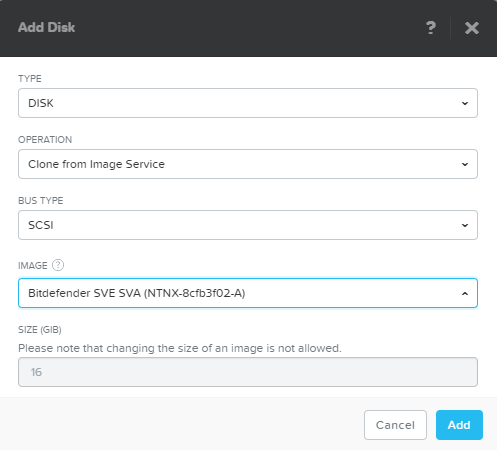
Under Disks, click “X” to remove the default CD-ROM disk, confirm the action and click Add New Disk. Configure the disk as follows:
Type: Disk.
Operation: Clone from Image Service.
Bus Type: SCSI.
Image: Select the Security Server image you have uploaded.
Click Add.
Under Network Adapters (NIC):
Click Add New NIC.
Choose the preferred network.
Click Add.
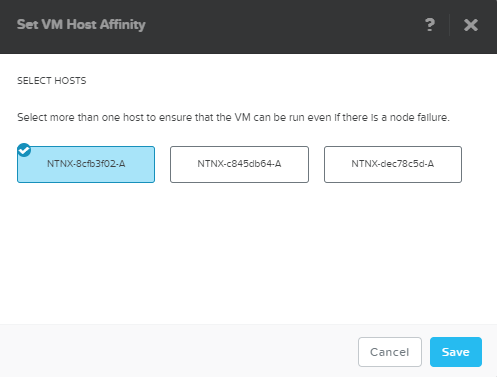
Under VM Host Affinity:
Click Set Affinity.
Select one of the hosts.
Click Save.
Click Save. The virtual machine is created with the VM create with customize label.
Go to virtual machines list.
Select the Security Server virtual machine.
Click Power on.
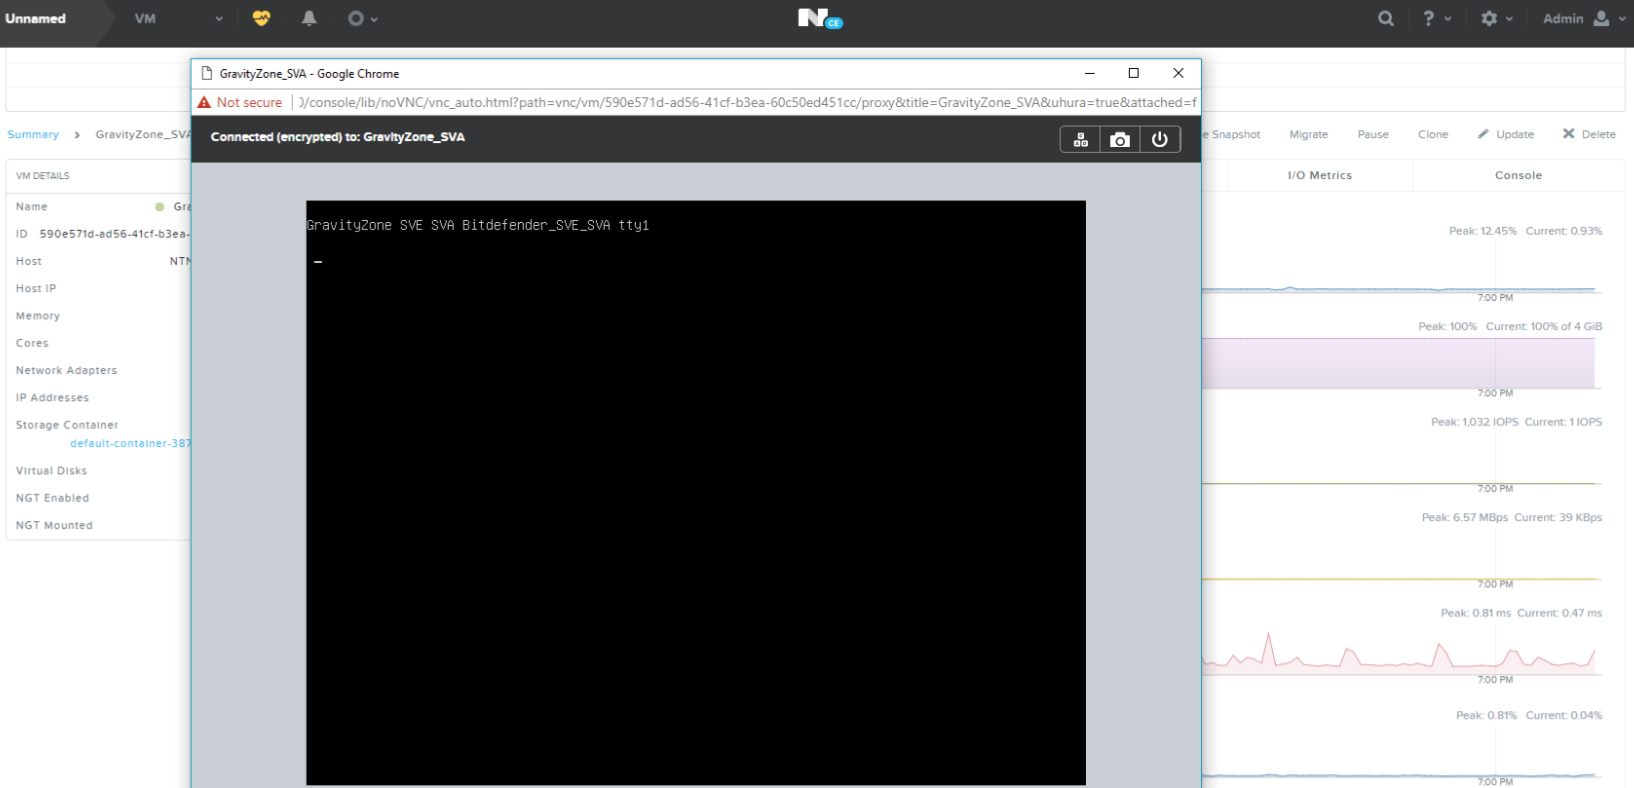
Click Launch console and log in to Security Server by using the default credentials:
User name:
rootPassword:
sve
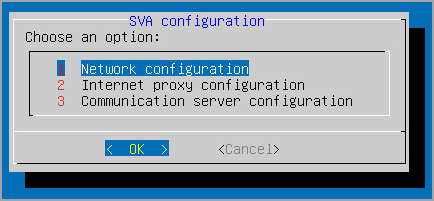
Run the
sva-setupcommand. You will access the appliance configuration interface.To navigate through menus and options, use the
Taband arrow keys. To select a specific option, pressEnter.Go to Communication Server configuration.
Enter the address of the Communication Server, including the port number 8443, using the following format
https://Communication-Server-IP:8443Alternatively, you can use the Communication Server hostname instead of the IP address.
Select OK to save the changes.
Install Bitdefender Security Server in Nutanix AHV
This section aims to explain how to import and deploy Bitdefender Security Server in Nutanix AHV.
Importing the Security Server
Log in to GravityZone.
Go to the Network > Packages page.
Select the default Security Server Virtual Appliance package.
Click the Download button in the upper-left side of the table and select the Nutanix Prism (VMDK) version. Depending on your browser settings, the file may be downloaded automatically to a default download location.
Log in to PRISM, the Nutanix Web Console.
Import the VMDK file:
Click the gear button in the upper-right corner of the console to access the Settings menu and select Image Configuration.
The configuration window is displayed.
Click Upload Image. A new window pops up, asking you to enter image details.
Enter a suggestive name for the image.
From the Image Type menu, choose Disk.
From Image Source, select Upload File and choose the VMDK file you have previously extracted.
Click Save. Wait while the virtual drive is being uploaded. When finished, you will be able to view the image in the list of existing images.
Create the virtual machine for the Bitdefender Security Server VMDK file:
Go to the VM page using the menu at the upper left corner of the console.
Click the Create VM button at the upper right corner of the page.
In the new configuration window, enter the requested details:
A suggestive name and a description for the VM.
Hardware configuration such as number of CPUs, cores per CPU and memory. These values must meet the Bitdefender Security Server requirements. You can find more information in the GravityZone Installation Guide.
Click Add new disk. A configuration window is displayed.
Configure the disk settings as follows:
• Type: Disk
• Operation: Clone from Image Service
• Bus Type: SCSI
• Image: the image you have previously created.
Click Add.
Click Add new NIC and choose the network you want to use.
Click Save.

Deploying the Security Server
In Nutanix console, go to the VM > Table section.
Power on the newly created machine.
Click Launch Console.
Connect to the Security Server via SSH. For details regarding configuration steps, refer to Deploying Security Server Installation Packages.
Configured Security Server.
Install Security Server in Microsoft Azure
You can use Security Server to protect your Microsoft Azure virtual machines as follows:
Configure the Security Server installed in your local network to communicate with the Microsoft Azure virtual machines. Therefore, you will be able to use your local resources, either physical or virtual, to protect also the Microsoft Azure inventory.
Install one or several Security Server instances in your Microsoft Azure environment, according to your needs.
Important
For the communication between your Microsoft Azure virtual machines and the Security Server instances installed in your Microsoft Azure inventory to work, you need to properly configure your virtual network/subnet. For details, refer to Microsoft Azure Virtual Network Documentation.
We recommend installing the Security Server in the same Microsoft Azure region with the virtual machines you want to protect.
The default scan mode for Microsoft Azure virtual machines is Local Scan (security content is stored on the installed security agent, and the scan is run locally on the machine). If you want to scan your Microsoft Azure virtual machines with a Security Server, you need to configure the security agent’s installation package and the applied policy accordingly.
Installation steps
Download the Security Server virtual appliance image (VHD file) from the Packages page of GravityZone Control Center to C:\vhd.
Resize the appliance to a supported Azure filesize:
Resize-VHD -Path C:\vhd\Bitdefender_SVE-SVA-Multi-Platform.vhd -SizeBytes 21GBPrepare PowerShell for Azure:
Install-Module AzureRM Login-AzureRmAccountUpload the file to Azure:
$resourceGroupName = "Resources" $recreatedVhd = "C:\vhd\Bitdefender_SVE-SVA-Multi-Platform.vhd" $destinationVhd = "https://mystorearea.blob.core.windows.net/vhds/Bitdefender_SVE-SVA-Multi-Platform.vhd" Add-AzureRmVhd -LocalFilePath $recreatedVhd -Destination $destinationVhd -ResourceGroupName $resourceGroupName -NumberOfUploaderThreads 5Note
Azure supports only fixed sized VHD files. Add-AzureRmVhd commandlet takes the dynamic size VHD file and uploads it as a fixed size.
$destinationVhd is a custom path. Make sure to choose a valid path in your Azure environment.
Create the virtual machine in Azure:
Get the network to be attached to the VM:
$virtualNetworkName = "Resources-vnet" $locationName = "westeurope" $virtualNetwork = Get-AzureRmVirtualNetwork -ResourceGroupName $resourceGroupName -Name $virtualNetworkNameNote
Depending on your Azure setup, you may need to use other values for the above mentioned variables.
Configure public IP:
$publicIp = New-AzureRmPublicIpAddress -Name "SVASrv" -ResourceGroupName $ResourceGroupName -Location $locationName -AllocationMethod Dynamic $networkInterface = New-AzureRmNetworkInterface -ResourceGroupName $resourceGroupName -Name "SVASrv-Interface" -Location $locationName -SubnetId $virtualNetwork.Subnets[0].Id -PublicIpAddressId $publicIp.IdConfigure VM settings:
$vmConfig = New-AzureRmVMConfig -VMName "SVASrv" -VMSize "Standard_DS1" $vmConfig = Set-AzureRmVMOSDisk -VM $vmConfig -Name "SVASrv" -VhdUri $destinationVhd -CreateOption Attach –Linux $vmConfig = Add-AzureRmVMNetworkInterface -VM $vmConfig -Id $networkInterface.IdCreate the VM in Azure:
$vm = New-AzureRmVM -VM $vmConfig -Location $locationName -ResourceGroupName $resourceGroupName
Configure Security Server to connect to GravityZone:
Connect to the Security Server appliance via SSH.
Log in with default credentials.
Run the Security Server setup:
# /usr/bin/sva-setupSelect option 3 Communication Server configuration from the menu.
Choose the on-premises option as the server type, when prompted.
Add the Communication Server address depending on your company location:
EU:
https://cloudgz-ecs.gravityzone.bitdefender.comUS:
https://cloud-ecs.gravityzone.bitdefender.comAlso, select option 4 Configure the client ID and enter your company ID.
Select Ok to confirm your action.