Deploying Bitdefender Endpoint Security Tools for Mac through Microsoft Intune
This article describes how to deploy Bitdefender Endpoint Security Tools (BEST) on macOS computers through Microsoft Intune. To have the security agent fully functional without requiring local user interaction, you must follow these procedues:
Deploy BEST using a custom script
You can deploy Bitdefender Endpoint Security Tools on client machines through Microsoft Intune using a custom script. The script connects to GravityZone, downloads and installs the kit, and it does a quick cleanup.
Note
When you use the script, BEST does not show up as an app in Microsoft Intune.
The following example is a proof-of-concept (POC) used during testing which succeeded in installing BEST when deployed through Microsoft Intune.
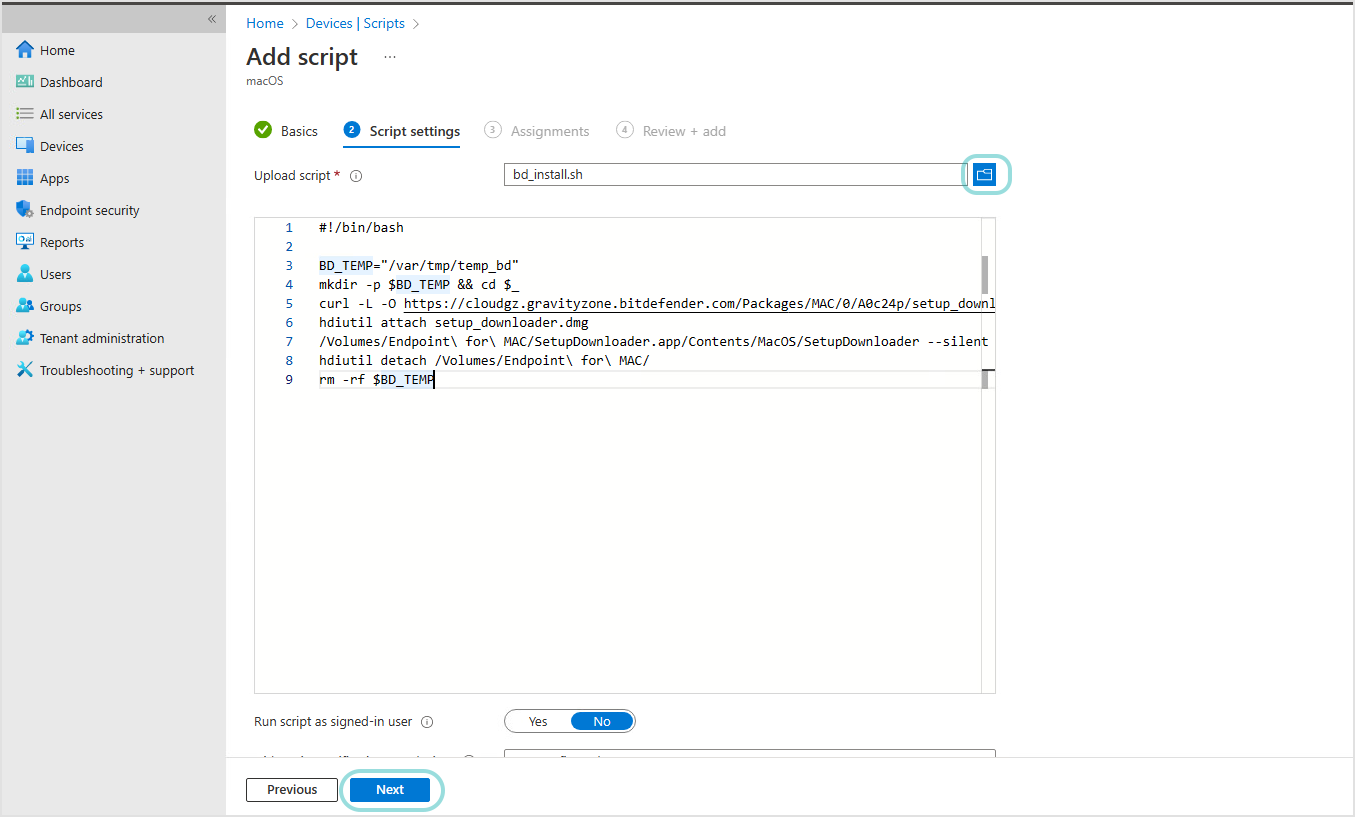
#!/bin/bash

BD_TEMP="/var/tmp/temp_bd"
mkdir -p $BD_TEMP && cd $_
curl -L -O https://cloudgz.gravityzone.bitdefender.com/Packages/MAC/0/A0c24p/setup_downloader.dmg
hdiutil attach setup_downloader.dmg
/Volumes/Endpoint\ for\ MAC/SetupDownloader.app/Contents/MacOS/SetupDownloader --silent
hdiutil detach /Volumes/Endpoint\ for\ MAC/
rm -rf $BD_TEMP
Because this script is executed with the highest privileges, it can be easily customized based on user preferences.
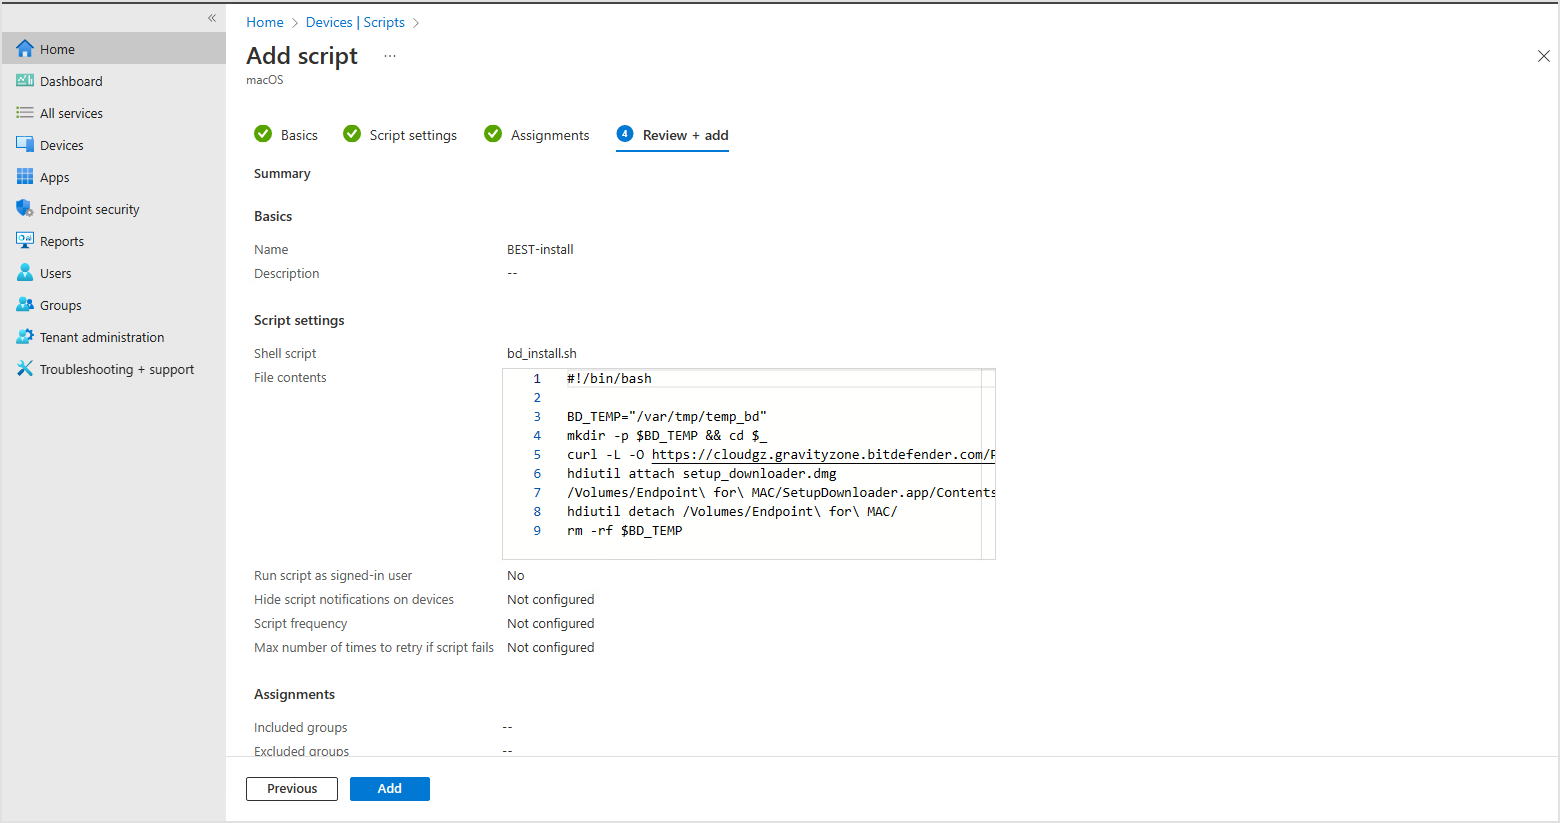
To deploy the script through Microsoft Intune, follow these steps:
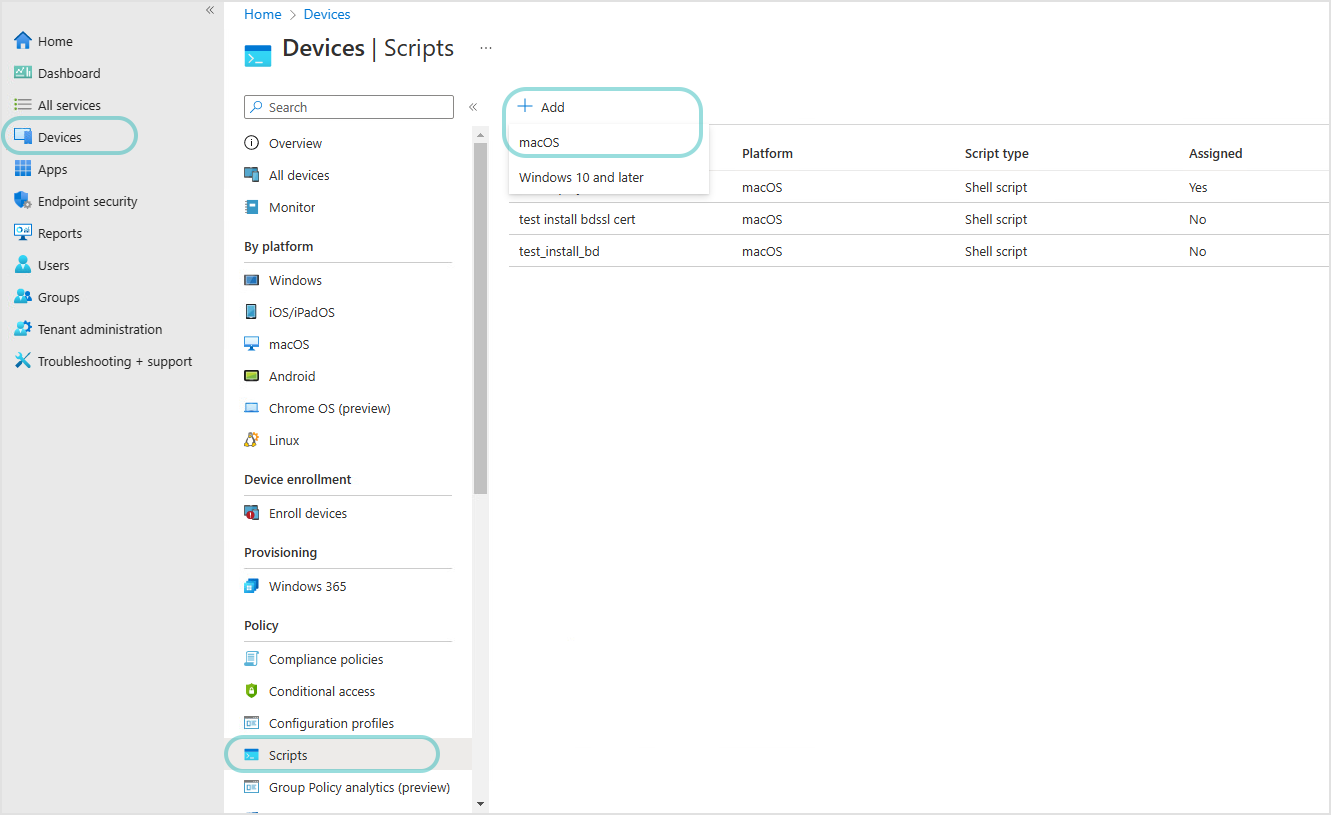
In Microsoft Endpoint Manager, go to Devices > Scripts.
Click Add and select macOS.

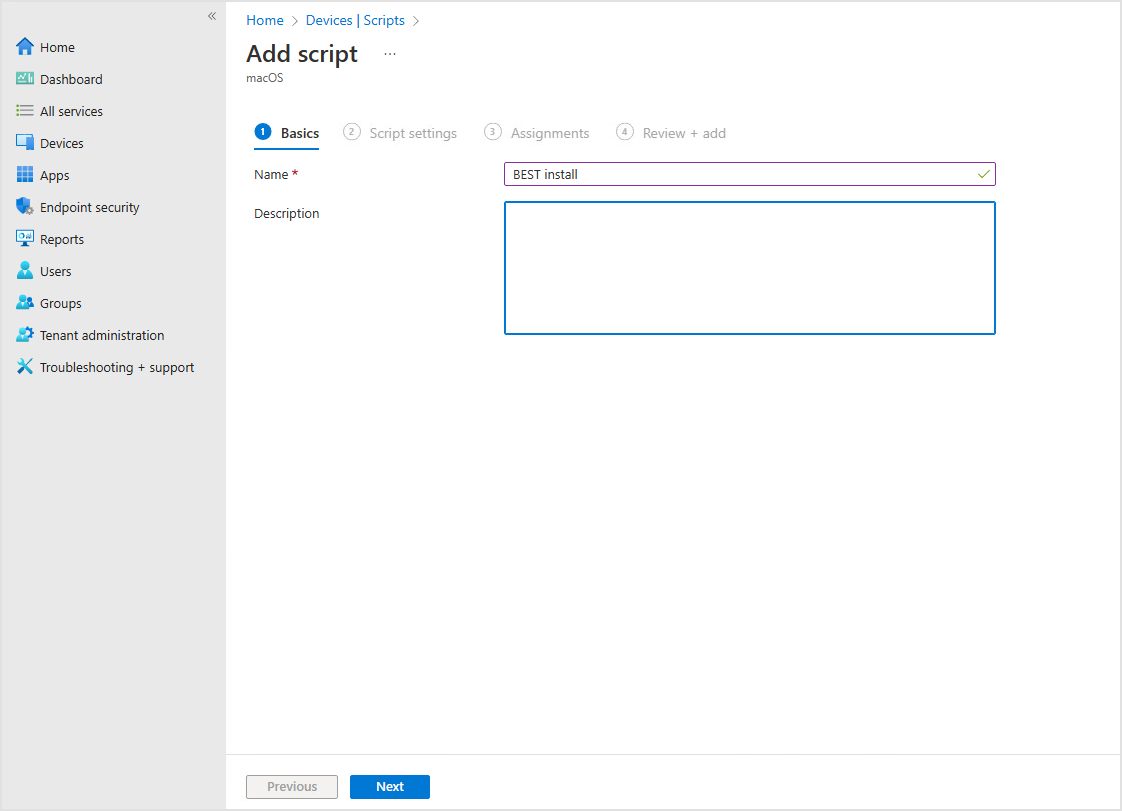
Enter a name for script and click Next.

Upload the script and click Next.

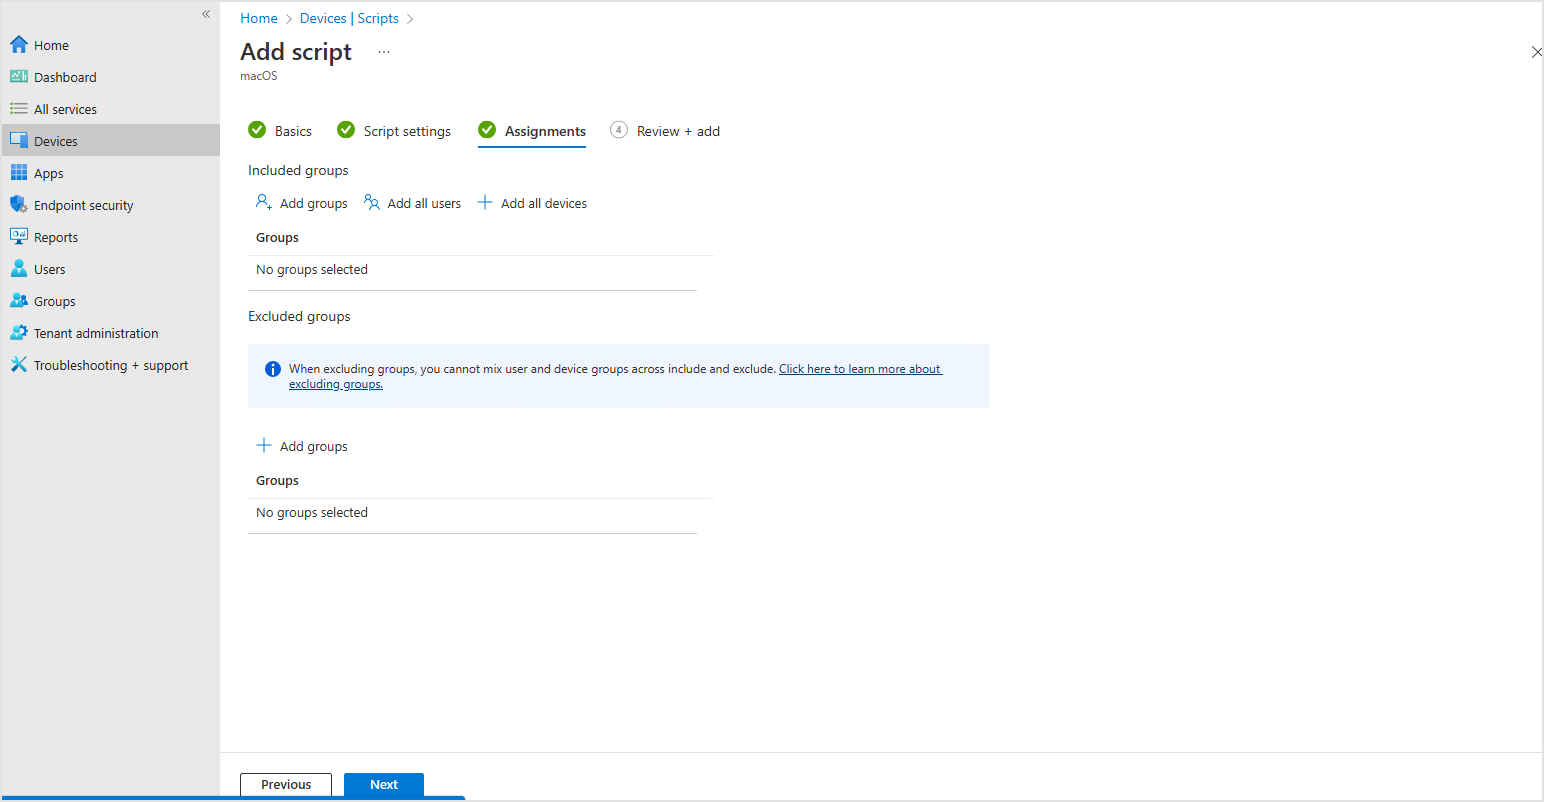
Select the group assignments and click Next.

Review the settings and click Add.

The script is being executed based on groups and users assignments.
Deploy the SSL certificate
This section describes how to deploy the required SSL certificate through Microsoft Intune, to have it automatically approved and ready to use without user interaction.
As of March 2023, Microsoft Intune does not support the deployment of certificates in PFX format, but it does however support regular CER format.
Important
For this procedure to work, the Bitdefender installation package created in GravityZonemust have an uninstall password setup.
To deploy the SSL certificate, follow these steps:
Obtain the MD5 hash of the uninstall password setup in GravityZone for the installation package used.
This can be achieved with various GUI tools or by using the Terminal, where you run the following command:
md5 -s "YourUninstallPassword"
Generate a PFX certificate using PEM and KEY files.
Example:
# generate the certificate
openssl req -new -days 1825 -nodes -x509 -subj '/C=RO/ST=Bucharest/L=Bucharest/O=Endpoint/CN=NewName CA SSL' -keyout rootCA.key -out rootCA.pem

# create the PFX certificate using the .key and .pem generated previously
openssl pkcs12 -inkey rootCA.key -in rootCA.pem -export -out certificate.pfx
Note
After running this step, you are prompted for a password. Make sure to enter the MD5 hash of the uninstall password set on the BEST installation package obtained in step 1.
Create the certificate in CER format.
Example:
openssl x509 -inform PEM -in rootCA.pem -outform DER -out certificate.cerFollowing this step, you have both
certificate.cerandcertificate.pfxavailable.Deploy the CER certificate through Microsoft Intune. Follow these steps:
Go to Devices > Configuration Profiles.
Select Create Profile, then Platform: macOS and Profile Type: Template.
Select Trusted Certificate and click Create.
In the Basics tab, enter a name and click Next.
In the Configuration Settings tab, select the certificate.cer file that was generated previously and click Next.
In the Assignments tab and assign the appropriate groups and users, and complete the setup.
Deploy the PFX certificate on the target machine.
Note
The PFX certificate needs to be available on the target machine in the path:
/Library/DeployCert.To deploy the PFX certificate, you can have the certificate hosted on a resource accessible by the client and run a script through Microsoft Intune that simply copies it on the machine.
Here is an example of such a script that downloads the certificate from a web server and copies it to the required location.
#!/bin/bash

BD_TEMP="/var/tmp/temp_bd"
mkdir -p $BD_TEMP && cd $_

# assuming that the certificate is hosted on a web server at 10.25.99.228:8000
curl -L -O http://10.25.99.228:8000/certificate.pfx
mkdir -p /Library/DeployCert
mv certificate.pfx /Library/DeployCert
rm -rf $BD_TEMP
Note
The certificate deployed to
/Library/DeployCertusing this procedure has priority over the Bitdefender CA SSL certificate, which has been initially installed and trusted in keychain. After this procedure, Bitdefender Endpoint Security Tools stops using Bitdefender CA SSL and loads the new certificate instead.
Create the MDM configuration profile
This section describes how to create the MDM configuration profile in Microsoft Endpoint Manager, to automatically take these actions:
Enable full disk access for the
BDLDaemonandEndpointSecurityForMacfilesApprove the Bitdefender system extension
Approve the Bitdefender DCI extension
This way, BEST has access to all necessary resources on Mac and does not require user interaction to be fully functional.
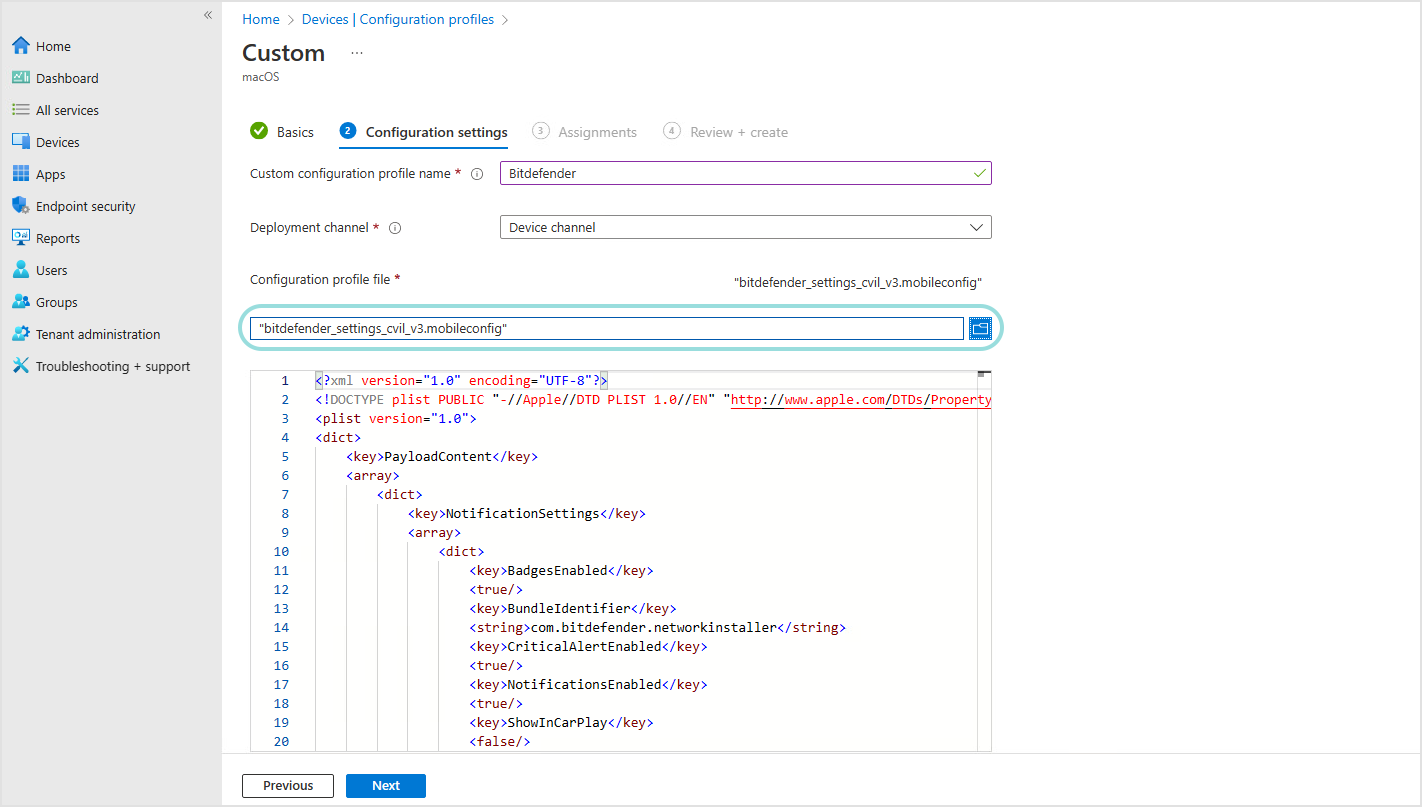
To create the profile, follow these steps:
In Microsoft Endpoint Manager, go to Devices > Configuration Profiles.
Select Create Profile, followed by Platform: macOS and Profile Type: Templates.
Select Custom and click Create.
In the Basics tab, enter a name and click Next.
In the Configuration Settings tab, enter a name in the Custom configuration profile name, set Deployment channel to Device channel and upload the configuration file available here.

Click Next.
In the Assignments tab, assign the appropriate groups and users and complete the setup.
Deploy Bitdefender Endpoint Security Tools for Windows through Microsoft Intune
This article describes how to deploy Bitdefender Endpoint Security Tools (BEST) on Windows endpoints through Microsoft Intune.
This deployment uses the BEST Windows installer, packed as a Windows application (Win32) with the help of the Microsoft Win32 Content Prep Tool. Afterwards it is deployed through Microsoft Intune.
Important
Make sure the target endpoint is enrolled in Intune and has an active internet connection.
Create the BEST installation package
To create the installation package follow these steps:
Create a folder that is going to be used for future operations.
For this example
C:\testis going to be used.Create an installation package in GravityZone.
Download the BEST installer and save it in the previously created folder.
Download the official Microsoft Win32 Content Prep Tool.
Open Command Prompt.
Navigate to the folder where the Microsoft Win32 Content Prep Tool installer was downloaded.
Launch the Microsoft Win32 Content Prep Tool and follow the displayed instructions.
The following table contains a summary for each step, using the folder mentioned in step 1:
Step | Summary |
|---|---|
| The source folder where the installer is located. In this example, it is in |
| The name of the installation package. In this example, the file should be: |
| The output folder where the package created by the Microsoft Win32 Content Prep Tool will be placed. You can use the same source folder for output as well. |
After you create the installation package, a new file is going to be available in the output folder. It will have the same name as the BEST Windows installer, but with .intunewin added as an extension. This will be the package that is going to be uploaded to Intune and used for deployment in the next section.
Note
For more information about preparing and deploying Win32 apps, refer to the official Microsoft documentation.
Deploy BEST
After the BEST installation package is ready, you must prepare the application in Microsoft Intune by following these steps:
Open the Microsoft Intune Admin Center.
Go to Apps > Windows.
Select Add.
In the Select app type window, select Windows app (Win32).
Click Select.
In the App information tab, click Select app package file.
In the App package file menu, select the
.intunewinfile that was previously created.Click Ok.
The App Information window must be filled in with the following mandatory information about the uploaded package:
Field
Summary
Name
The name of the application: Bitdefender Endpoint Security Tools.
Description
A small description that you can add for this application.
Publisher
The publisher name is: Bitdefender.
After the information is added, click Next.
The Program window contains some mandatory fields that must be filled in:
Field
Summary
Install command
This is the BEST installation command. You must add the regular installation command for the new installer, with the option to run a silent installation:
setupdownloader_[base64_hash].exe /bdaparams /silentImportant
Make sure that the
[base64_hash]is the actual string contained in the package you have created and downloaded.This is an example of a command using the
base64encoded string:setupdownloader_[aHR0cHM6Ly9leGFtcGxlLW9mLXRoZS1wYXRoLXRvLWdyYXZpdHl6b25lLWluc3RhbGxlci54bWw=].exe /bdaparams /silentUninstall command
The BEST uninstall process must be controlled through GravityZone, but since this field is marked as mandatory you can add:
No.Allow available uninstall
This option must be set to
No. The BEST uninstall process must be controlled through GravityZone.Install behavior
For this field you must select
System.Delete all entries under the Return code section that can indicate the post-installation behavior. This ensures that you can properly control the post-installation status during next steps.
Click Next.
In the Requirements window, the following fields are mandatory:
Field
Summary
Operating system architecture
Since you are using our own installation kit, you can select both
32bitand64bit.Minimum operating system
You must use Windows 10 version 1607, which is the first RS version.
Click Next.
In the Detection rules window, go to Use a custom script > Select File and upload the following script as a
.ps1file:if ((Get-ItemProperty -Path "HKLM:\SOFTWARE\Microsoft\Windows\CurrentVersion\Uninstall\Endpoint Security" -Name "InstallLocation")` -and ((Get-Service EPIntegrationService).status -like "Running")` -and (Get-Service EPSecurityService).status -like "Running" ) { Write-Output "Bitdefender Endpoint Security Tools was succesfully installed" exit 0 } else { Write-Output "Bitdefender Endpoint Security Tools was not installed" exit 1 }
It is strongly recommended to code sign the detection script and set the
Enforce script signature check and run script silentlyoption toYes. This assure that the script comes from a trusted source and was not tampered with after it was signed. This option allows the script to run without any additional confirmations or prompts.If you choose not to code sign the detection script, the
Enforce script signature check and run script silentlyoption can be set toNo. While this is not recommended, if the PowerShell execution policy on the target endpoint is set to restricted, you are going to be prompted with a confirmation for the script to run.This script checks if BEST was installed, by verifying the
HKLM:\SOFTWARE\Microsoft\Windows\CurrentVersion\Uninstall\Endpoint Securityregistry key. In addition, it ensures that theEPSecurityServiceandEPIntegrationServiceservices are running.The Dependencies and Supersedence windows can be left with default values.
In the Assignments window you can set up what users or user groups can use the installer.
In the Review + create window, select Create.
The application is going to be installed. Additionally, it is also going to to be displayed in the Intune Management Console and marked as installed in the Managed Apps section on each endpoint.
Preparing macOS machines for Bitdefender Endpoint Security Tools deployment via Relay
In a medium to large macOS environment, you can deploy Bitdefender Endpoint Security Tools (BEST) faster and easier from GravityZone Control Center through a Relay computer. The Relay role is available only for Windows and Linux operating systems.
Here is what you need to do to make the deployment process possible through this method:
1. Adding the Relay role on a Windows or Linux machine
Remote deployment of Bitdefender Endpoint Security Tools requires another machine that runs the Bitdefender agent with the Relay role installed. To add the Relay role, perform a Reconfigure agent task on that machine. Follow these steps:
In GravityZone Control Center, go to the Network page.
In the Network inventory, select the Windows or Linux machine on which you want to install the Relay role.
Click the Tasks button in the action toolbar and select Reconfigure agent.
Alternately, right-click on the machine name and select Tasks > Reconfigure agent.
Run the Reconfigure agent task to add the Relay role to the target machine.
For details on how you use the Reconfigure agent task, refer to Reconfigure agent.
When deploying Bitdefender Endpoint Security Tools to Mac through a Linux relay, you must have the Samba package (smbclient) version 4.1.0 or above installed on the Linux machine, along with samba-client dependencies and samba-common package. For details, refer to Preparing workstations for Bitdefender Endpoint Security Tools remote deployment.
2. Running the network discovery task
The Relay machine automatically performs a network discovery task every 4 hours and, if the case, adds new entries in the Network inventory in GravityZone Control Center. However, you can manually run the network discovery task to find all the computers in your network, including Macs. Follow these steps:
In GravityZone Control Center, go to the Network page.
In the Network inventory, select the Windows or Linux machine on which you want to install the Relay role.
Click the Tasks button in the action toolbar and select Run network discovery.
Alternately, right-click on the machine name and select Tasks > Run network discovery.
For details on how the network discovery task works, refer to Understanding Network discovery.
3. Ensuring connectivity on macOS machines
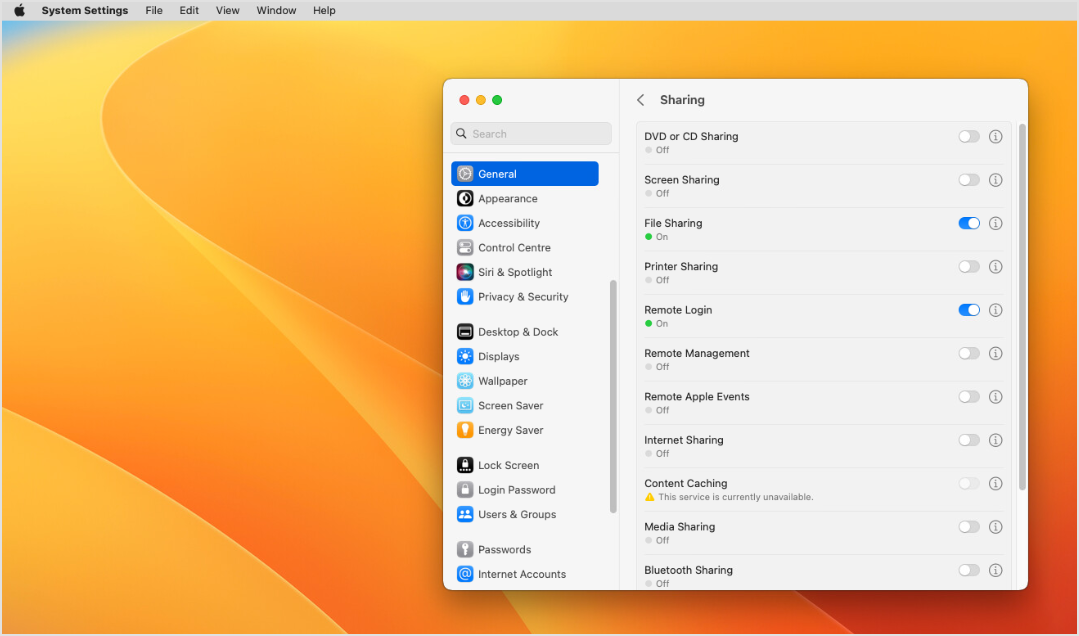
Regarding the macOS machines on which you intend to deploy Bitdefender Endpoint Security Tools, they need to have the Remote Login option enabled.
You can enable the Remote Login option in System Preferences > General > Sharing.
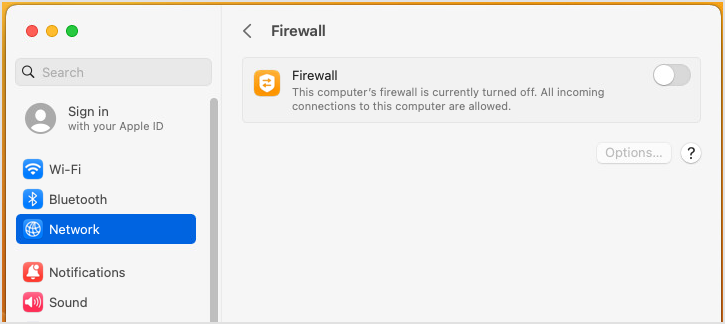
In addition, macOS machines must have firewall disabled in System Preferences > Network.
4. Verifying access to the macOS files and folders from the Relay
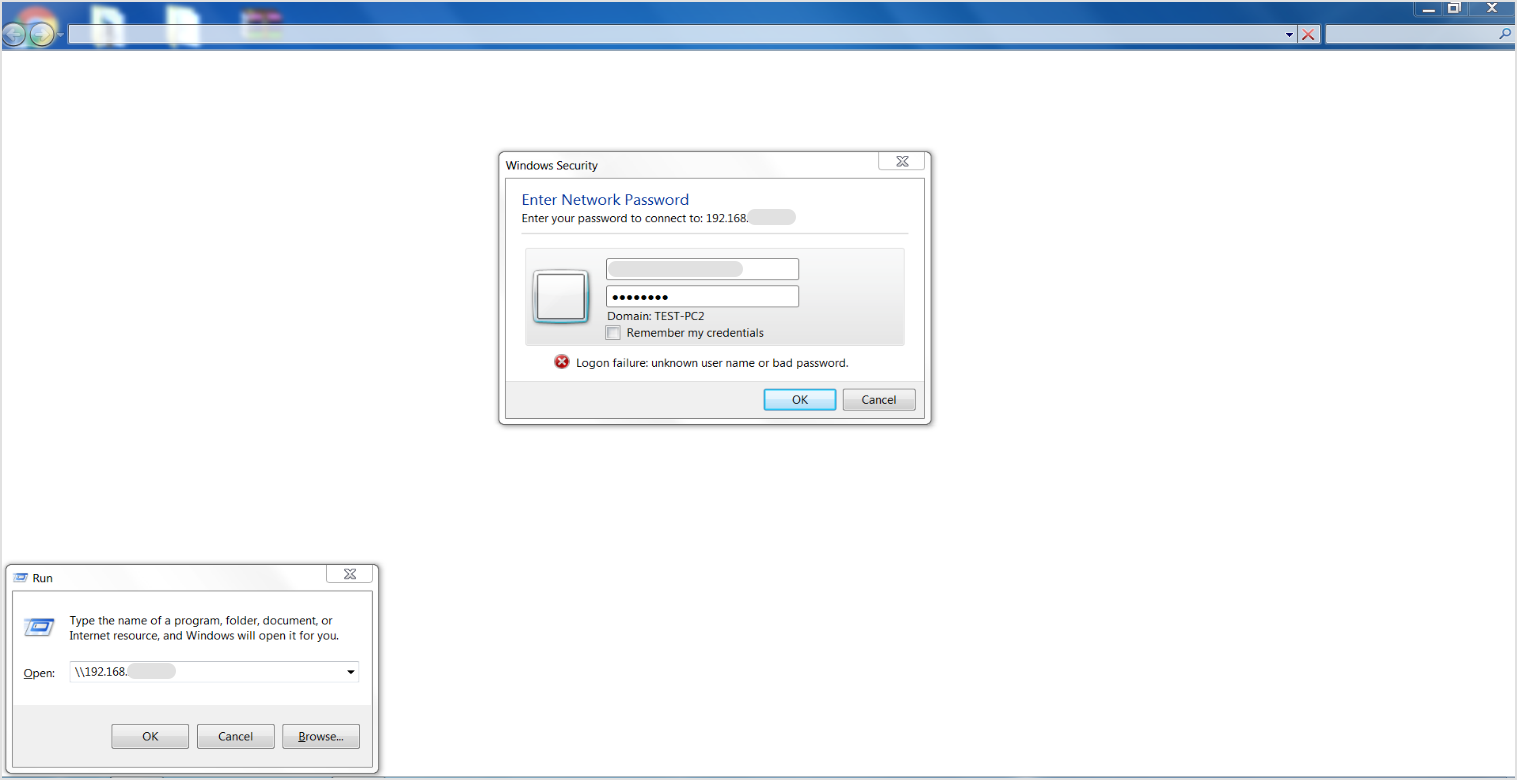
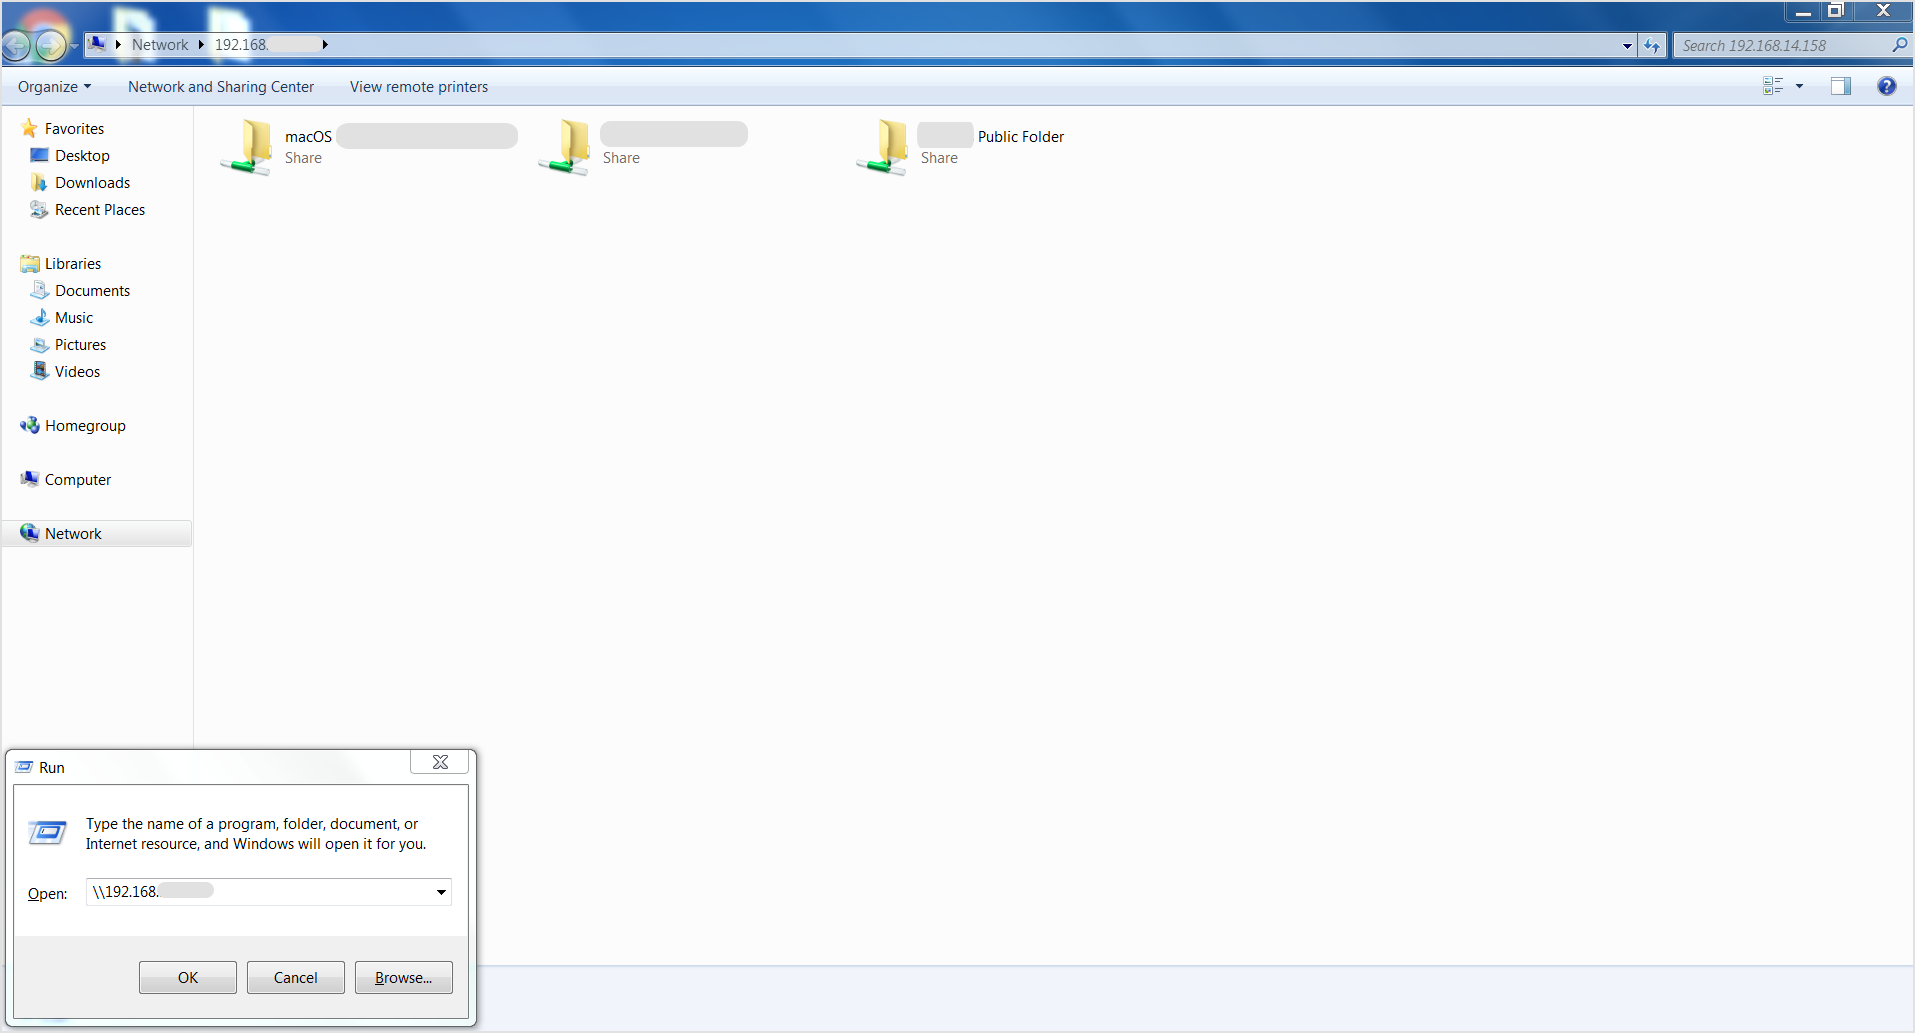
To make sure the deployment of Bitdefender Endpoint Security Tools will take place without issues, verify that you can access the files and folders on Mac from the Relay machine. If it is a Windows machine, follow these steps:
Press the
Windows+Rkeys to open the Run application.Type in the IP address of the macOS machine.
When prompted, enter the macOS credentials.

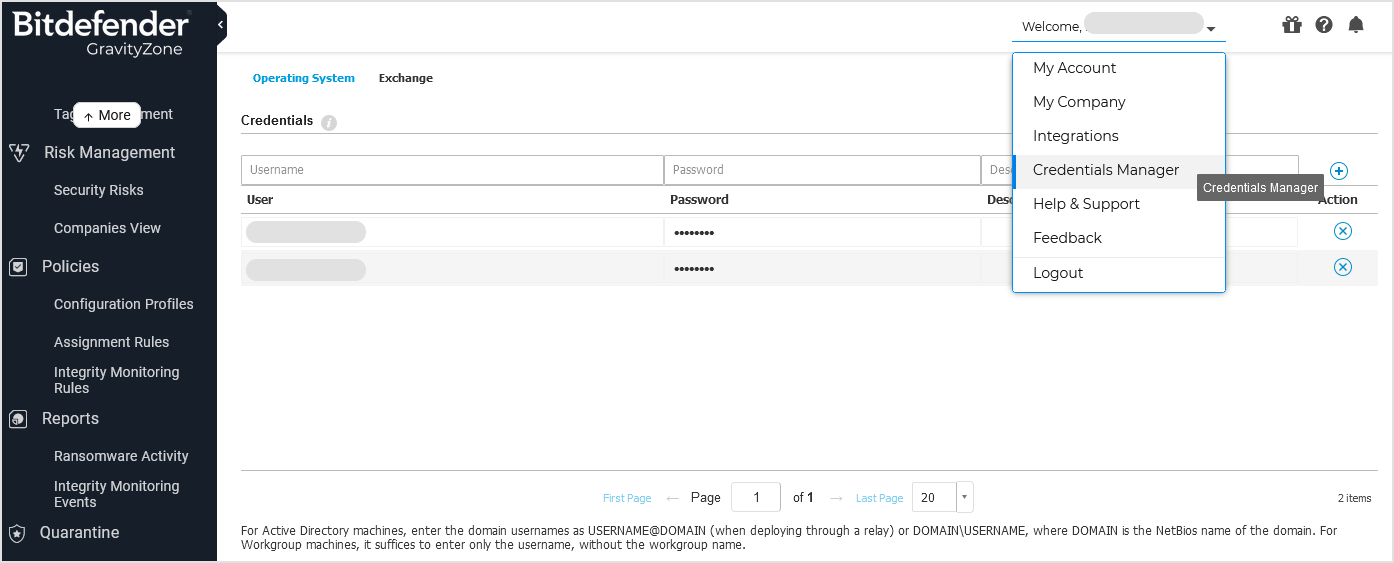
Keep in mind that you also must enter these credentials in Credentials manager in GravityZone Control Center. If you want to deploy BEST on multiple macOS machines, you must enter the user account credentials for all of them.

If the connection is successful, the macOS share is accessible from the Windows machine that serves as relay.
Now you can begin the actual deployment of Bitdefender Endpoint Security Tools on macOS machines. For the necessary steps, refer to Install security agents – standard procedure.
Page Menu
- Microsoft Intune
- Renew SCIM provisioning
- Rotate the local admin password for windows machine
- Deploy bitdefender to MacOS
- Change the Windows background image using intune
- Sync VPP apps to Intune
- Add Azure user to the local admin group
- Enroll MacOS Setup
- Deploy Adobe reader
- Apple MDM enrollment
- Compliance Policy
- Windows Configuration Designer
- Company Portal Customization
- Device Enrollment Manager
- Enrol a computer to Intune
